How to organize your pantry with a simple, 5-step method that is easy to follow and even easier to maintain. Create more space and make your pantry tidy!
Living in NYC has its perks, but one of them is definitely not space. We've lived in the same 600 sq foot apartment for nearly 5 years and as I'm sure many of you can imagine, it can get cramped.
Organization is key to staying tidy and making your space feel less cluttered.
Now I wouldn't say I'm the most organized person in the world, but I do love a good purge. Two years ago I read the book, “The Life-Changing Art of Tidying Up” and it was really eye-opening. We went through our entire apartment and got rid of over 20 bags of stuff. Clothes, books, my food styling props, toiletries, etc. Stuff we had accumulated over the years that we simply did not use anymore.
But for some reason, we stayed away from the kitchen. I cleaned it all out but didn't actually get rid of anything or reorganize it in a way that made sense. And every time I opened my pantry it felt like a bomb had gone off and I had zero idea what lurked in the far corners of my space.
Which is when I found Jamie Hord of Hoderly. Jamie is a professional organizer and is a master at turning small spaces into functional, pretty and clutter-free spaces in your home. I knew I needed Jamie's help in my kitchen and boy was I right. Jamie spent an entire day in my house, going through my entire kitchen, helping me get rid of what I didn't need any longer and creating a space that I know adore and feel good about every time I open the cabinets.
I not only wanted to share the before and after with you in today's post, but I also wanted to give you a 5-step method for cleaning and organizing your own pantry/kitchen.
How to Organize Your Pantry
As soon as Jamie arrived at my house I could tell she knew exactly what she was doing and had a clear method to the way she organized.
Jamie uses the SPACE method (which is from Julie Morgenstern) which stands for Sort, Purge, Assign a Home, Containerize, and Equalize. We're going to walk through each of the steps with you here.
STEP 1: SORT
Step one begins with pulling everything out of your cabinets and sorting it. So all the plates together, the bowls together, the oils together, the spices together, pasta, snacks, and so on. This allows you to see exactly how much you actually have of each item and then you are able to compare it all and choose what you love/don't love.
STEP 2: PURGE
This is a hard step for a lot of people because it involves getting rid of stuff. It's one of those scenarios where it always gets worse before it gets better, but just know, this is probably the most important step of the process.
You need to go through absolutely everything you have and then decide what you want to keep, what needs to be tossed, and what can be donated. Once you have your three piles, you are going to know every single item in your kitchen/pantry, without hesitating.
This is where having another person there to help you can be so beneficial; Jamie really guided me through any hard decision-making processes. Since we're working specifically on our kitchen, you also want to make sure that you're looking at expiration dates for everything. As well as duplicates! Anything that is expired gets tossed. Any duplicates either get donated or combined when possible.
Honestly, as scary as this process is, it's also so freeing. You will feel 1000 times lighter after letting go of all that stuff you no longer need!
STEP 3: ASSIGN A HOME
In step 3, we're giving everything we still want to keep a home in our space. This is where I feel like a professional can be really helpful since a lot of strategizing takes place to decide where each category should live. But if that isn't an option for you, Jamie suggests that you take these things into consideration:
- how often are you using this item (daily access needs to be more accessible)
- where in the kitchen does it make sense to live (i.e. near the fridge, oven, sink, etc.)
- does it fit in the space
Jamie actually laid out my entire kitchen before buying containers. She put things away how she thought it made sense and then we were really able to visualize the end result.
STEP 4: CONTAINERIZE
Now it's time for the fun part (at least in my opinion)! Putting things away and into their containers! Once we have the layout done, it's important to first measure your space and decide what needs to be contained and what doesn't. Think about where organizing products are going to make sense and be functional to help maximize your space. And then it's time to shop. The best places I've found are The Container Store, Bed Bath & Beyond and also you can use Amazon (just make sure to read the dimensions!).
After the shopping is done, it's time to put everything away! I'm going to dive into exactly what we used in my space so you can get a better idea of the different tools you can use to organize your pantry.
STEP 5: EQUALIZE
Sometimes the hardest thing to do is maintain your organization, but as long as you give everything its home, just continue to put it back in the same exact place each time. Putting things back where they belong, only replacing things when you're completely out of them and doing continual edits throughout the year (especially in the pantry for expired items), can all help you stick with your organization plan and continue to keep things nice and tidy!
And that's pretty much it! Following those 5 steps made a MASSIVE difference in my kitchen and now I actually feel like I have a space that I can a) function in and b) keep clean and organized. Such an awesome feeling!
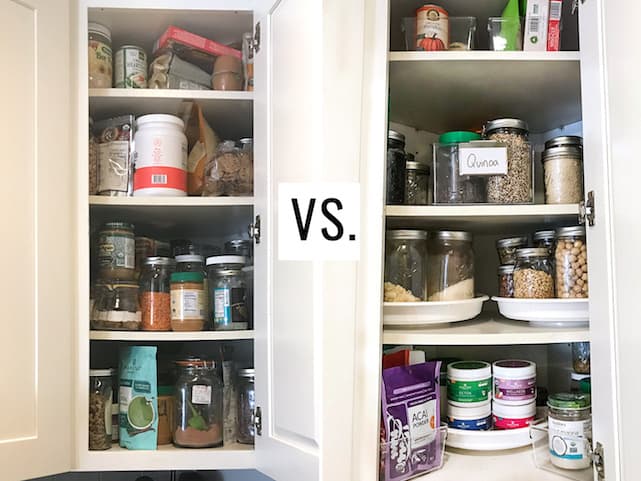
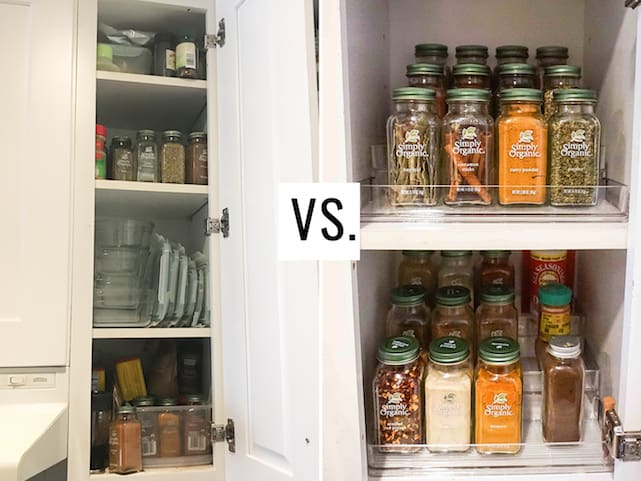
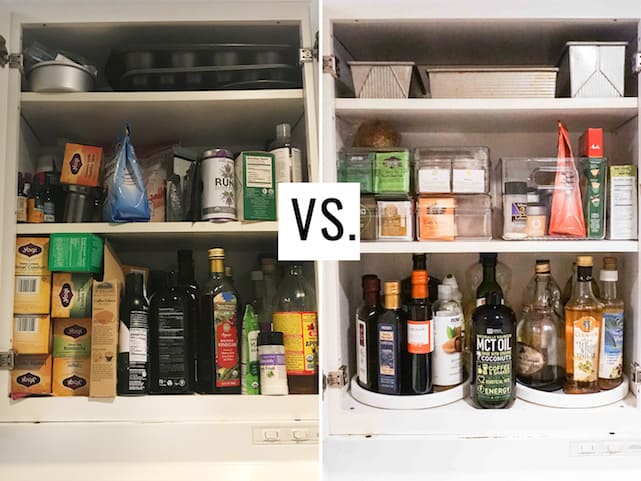
My Pantry Before & After
Pantry Organization Products
There were a few key items that we used to make my space more efficient. I've linked the exact products below, but before buying any of them, just make sure they actually fit in your space!
Clear Bins & Lazy Susans: as you can see from the photos, we were dealing with an awkward corner for my pantry, so we decided to go with a mixture of clear bins and lazy susans. The lazy susans allow me to reach everything and the clear bins are easy to slide in and out, while also allowing me to actually see what's inside.
- Bottom Shelf: this contains my most-used items in my kitchen. We used 1 lazy susan in the back and 2 clear bins on the side. We put containers of powders on the lazy suzan, protein/powders that come in bags are contained in a clear on the left side, and spreads (nut butters) are contained on the right.
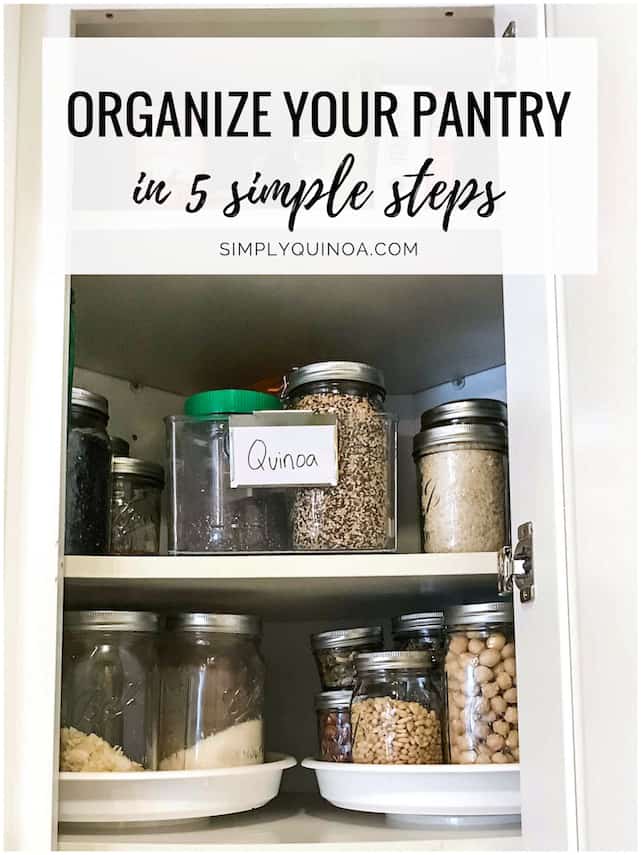
- Second Shelf: this shelf contains my nuts, seeds, dried fruit and ingredients I use for topping my smoothie bowls. We used 2 lazy susans side by side which works perfectly for these items since I store them in glass jars. I have easy access to everything with a little spin of the lazy susans and can see exactly what's inside all of my jars.
- Top Shelves: I'm fairly short, so we decided to go with more clear bins on these shelves so I could easily just pull the bins down, grab what you need, and then tuck back away. We have grains, quinoa (in the large bin) and beans on third self and my overflow canned goods and packaged ingredients on the top shelf (in small bins). This method prevents from items getting lost in the far back!
Baskets: We used 2 baskets on top of the fridge to store for pantry overflow. We have one basket for snacks and one basket for pasta and pasta sauces. The baskets are super easy to pull down and put back again, but also gives the top of your fridge a clean, organized look. We also gave our basket and bins labels so both of us know what is kept in each (the less confusion the better!)
Tea Storage Boxes: I've shared my tea collection before, but I had at least 20 boxes of tea that were taking up way too much space in my already cramped kitchen. We went through the tea, got rid of anything expired and then bought tea storage boxes to open up some space, but also making all of my varieties much more accessible. I organized them by type and now all of our tea (and coffee) supplies live right above the stove.
Lazy Susans: we also used small lazy susans for my oils and vinegars. I hadn't ever thought of this, but I LOVE it. It makes all the different varieties totally accessible and it fits perfectly in the space. Now I'm not pulling everything out to get to what you need while I'm cooking. And I also just really like the way it looks ????
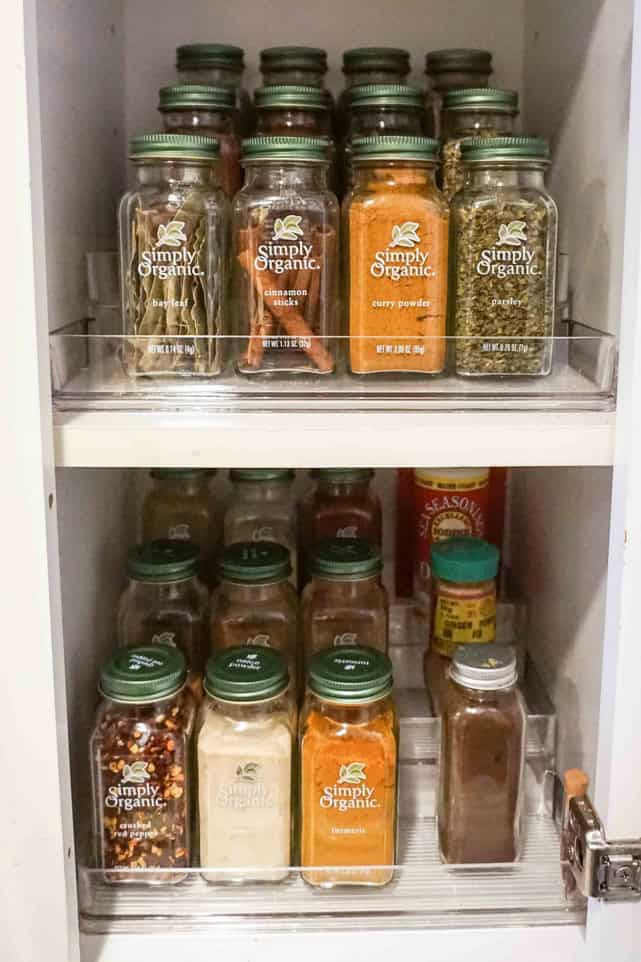
Spice Risers: As many of you know, I love my spices, but I was completely disorganized when it came to sorting them. The cabinet they live in is very small, but luckily we found spice risers that fit perfectly. Now I can actually see all of my spices! (YAY!) Since the spices take up all 4 shelves, we sorted them first by ones I am using almost everyday (first shelf) and then the ones I'm not using are on the next shelves, sorted each shelf alphabetically.
Shelf Risers: this doesn't really have anything to do with my pantry, but we did also pick up one shelf riser to elevate mugs to make it not only look better, but also fit more mugs. If we had more space I might try hanging mugs next time, but that's not doable with what we've got now.
Watch my Pantry Organization Video here!
New to cooking quinoa? Grab your FREE Quinoa Starter Guide!
Become part of the Simply Quinoa community and receive weekly emails with exclusive content that I only share in email, as well as my in-depth guide to starting your quinoa journey.
This is the absolute best. Super helpful and actually gets me excited to organize my pantry. Thank you for sharing these tips!!
Woo hoo! Would love to see a before and after photo 😉
Some great ideas here, but I just wanted to mention that a lot of the stuff in our pantries is good long after the expiration dates, and it’s a waste to automatically throw them away based only on the date.
Thanks for the tip! But I also do believe that it’s important to be safe 🙂