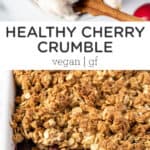
This easy cherry crumble recipe uses just a few simple ingredients, is naturally gluten-free, and also vegan. This truly is the ultimate summer dessert. The juicy cherry filling is fresh, bright, sweet, and tart all at once. Serve this crumble with a scoop of your favorite vegan vanilla ice cream!

An Easy Cherry Crumble Recipe for Summer
Summer is my favorite time of year for fruit because everything is flavorful, fresh, and usually fairly local. And I love turning a farmer's market haul into delicious desserts! When I'm not baking peach blueberry cobbler, berry crumble, or strawberry rhubarb crisp, I'm grabbing a bag of organic cherries to make this easy cherry crumble. The filling is fresh, bright, sweet, and tart all at the same time, baked under a buttery oat topping. The whole thing is gluten-free, vegan, and absolutely a cinch to make.
I love making this dessert for backyard BBQs. It's great for feeding a crowd, and you can bake a tray of this the day before and reheat it slightly before serving. And if you lay out some vanilla ice cream, it'll surely be kid-approved as well!

Ingredients you'll Need
This recipe has two parts: the cherry filling and the crumble topping. Both are vegan and gluten-free, made from the following ingredients. Scroll to the recipe card for the exact measurements.
Cherry Filling
- Cherries – Fresh cherries, preferably organic and mostly dark red. You could make the filling with frozen cherries, though you'll need to thaw and drain them first.
- Arrowroot starch – Helps to thicken the filling a little bit and hold in the juices.
- Coconut sugar – You could use any sweetener you'd like.
- Cinnamon – For a little warmth and depth of flavor. Feel free to use nutmeg, ginger, or a pie spice blend.
- Almond extract – Adds a really nice, unique flavor to the filling. Use pure vanilla extract if you prefer.
- Lemon juice – Brings out the tartness of the cherries and helps with the juiciness.

Crumble Topping
And then for our topping, we're actually using some of my favorite Bob's Red Mill products. They are the best suppliers for all my gluten-free baking needs! For our gluten-free crumble topping, we're using:
- Gluten-free rolled oats – I like to use old-fashioned rolled oats for a crunchy, chewy texture. Instant oats tend to be mushy, and steel-cut oats are too tough.
- Quinoa flour – I like to use a combination of flours in the topping.
- Sorghum flour – I wanted to try the topping with this, and it really worked. You could also use more quinoa flour if you want!
- Coconut oil – Adds a really nice flavor and helps the topping with that clumpy, crispy texture.
- Maple syrup – The BEST sweetener of all time, but you can also use coconut sugar.

3 Ways to Pit a Cherry
The only downside of fresh cherries is that you'll need to pit them! What you need to pit cherries are time and patience. But it helps to have a few useful tools and techniques at your disposal, too. The final result will be a delicious dessert, so it's worth it. In my experience, the three best ways to pit cherries are:
- Cherry pitter: A cherry pitter is a little kitchen gadget specifically designed to pit cherries (and olives!), and it makes this process a complete breeze.
- Metal straw: This is the method I use. I take a metal straw in one hand, cup the cherry in the other, and push the straw through the center of the cherry, pushing the pit out the other side. It's a bit of a messier method, but it works well!
- Paring knife: The last, longer method is to use a small paring knife to cut the cherry in half, and then remove the pit with your hands.
How to Make Cherry Crumble
Once you've gotten past the pitting of your cherries, making the crumble itself is a breeze.


- Make the filling. Combine all the cherry filling ingredients in a bowl. Stir to coat the cherries, and transfer the filling to a baking dish.
- Make the topping. Add the crumble topping ingredients to another bowl and mix. The topping should be slightly sticky and clumpy. Those clumps will crisp up as they bake to make the crunchy topping. Spread the crumble over the cherries in the dish.
- Bake! Bake the cherry crumble at 350ºF for 50-60 minutes. As the crumble bakes, look for two things: browning and bubbles. You want the top to be golden brown and the cherries to be bubbling. This takes around 50-55 minutes, so if the topping starts to brown too quickly before it's done, cover it with foil to keep it from burning.
What to Serve with Cherry Crumble
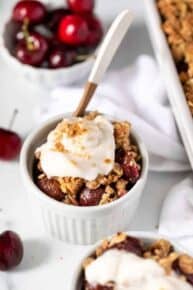
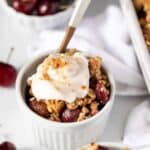
If you are planning on serving this as a dessert, it's best with ice cream. I like to choose a coconut-based vegan vanilla ice cream, but this also works great with homemade banana ice cream, chocolate, cherry, pistachio, or even a lemon sorbet.
But what's even better about this crumble is that you can enjoy the leftovers for breakfast. A bowl of warm cherry crumble topped with coconut yogurt is the perfect treat on a summer morning!

More Fruit Crisp & Crumble Recipes
Cherry Crumble Recipe
Ingredients
for the cherries:
- 2 lbs fresh cherries , pits removed
- 2 tablespoons coconut sugar
- 2 tablespoons arrowroot starch
- Juice of 1/2 a lemon (2 tablespoons)
- 1/2 teaspoon ground cinnamon
- 1/4 teaspoon almond extract
for the topping:
- 1 1/2 cups Bob's Red Mill old fashioned oats
- 1/3 cup quinoa flour
- 1/4 cup sorghum flour
- 1/4 cup coconut oil
- 1/4 cup maple syrup
- 1 teaspoon vanilla
- 1/2 teaspoon cinnamon
Instructions
- Preheat the oven to 350ºF.
- Remove the pits from the cherries (reference above for the how-to). Add them to a bowl and top with coconut sugar, arrowroot, lemon, cinnamon, and almond extract. Stir around to coat, then transfer to a 9×13 baking dish.
- In a separate mixing bowl, combine all the topping ingredients. Stir together until a sticky(ish) mixture forms. Sprinkle the topping over the cherries.
- Bake for 50 – 60 minutes until the topping is golden brown and the cherries are bubbling. Check at 30 minutes and if the topping is getting too brown, cover with foil and continue baking.
- Allow crisp to cool for 5 – 10 minutes, then serve with a dollop of your favorite vanilla ice cream (I use vegan coconut yogurt!).
Video
Nutrition
Filed Under:
This recipe is brought to you in partnership with Bob’s Red Mill. As always, all opinions are my own. I only share companies I love and trust, so thank you for continuing to support Simply Quinoa!